


介護日誌
وصف لـ介護日誌
الرعاية اليوميات هو تطبيق من شأنها أن تترك سجل رعاية الأسرة اليومية.
الملف يمكن تسجيل أي شخص! وبالإضافة إلى ذلك، لأنها ليتم عرضها عن طريق التحول التقويم لكل ملف تعريف، وأنها مريحة جدا لأنه يمكنك أيضا رعاية إدارة خطة لكل Purofu.
ليس فقط الصورة اليومية، يمكنك إدارة من قبل الحدث تسجيل بسيطة (مثل المشي، والغذاء، والاستحمام وإعادة التأهيل). بحيث يمكنك أيضا تخطيط وتكرار تسجيل الجدول الزمني لهذا اليوم، فضلا عن إدارة المخطط ليكون كل شهر، وبالنسبة لنا لإعلام الإعداد إنذار!
كيفية استخدام مذكرات الرعاية
* الأولي الشاشة *
الشاشة الأولي هي تسجيل البيانات الشخصية. عند بدء التطبيق للمرة الثانية بعد أن تصبح الشاشة الأولية تقويم.
أولا، دعونا نبدأ من تسجيل البيانات الشخصية!
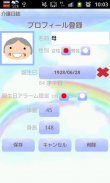
* لمحة عن طريقة التسجيل *
1. يرجى الاستفادة من تقويم في الزاوية اليمنى العليا من علامة الكاميرا +. وسوف ينتقل إلى "الملف الشخصي".
2. هي الزاوية العليا اليمنى من زر + لإضافة زر "الملف الشخصي". I اضغط على الزر إضافة.
3. وسوف ينتقل إلى "الملف التسجيل". أدخل العناصر المطلوبة، يمكنك أيضا صور من التسجيل! الرجاء حفظ في زر "حفظ" في نهاية المطاف.
4. سأعود إلى "الملف الشخصي". إذا كان لديك أي ملف تريد أيضا مسجلة الآخرين، دعونا مواصلة تسجيل في الزر إضافة!
5. يرجى الاستفادة من الاسم الذي تريده ليتم عرضها على التقويم للمرة الأولى. سأعود إلى التقويم في زر "رجوع" على المحمول.
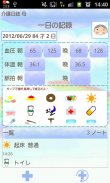
* التحويل من شاشة التقويم لكل ملف تعريف *
عند الانتهاء من تسجيل البيانات الشخصية، وسوف أعود إلى التقويم. يتم عرض الصور من التعريف الذي قمت بتحديده في الجزء العلوي الأيمن. عند النقر على الصورة، ويمكنك إعادة تحديد وPurofu مختلف في "الملف الشخصي".
* دعونا نضع سجل اليوم! *
1. "يمكنني تسجيل حدث في الصنبور هنا!" تحت تقويم أو زر قلم رصاص التقويم أصبحت أقل اليسار على زر "تحرير". وسوف الاستفادة سواء.
2. وسوف ينتقل إلى "تسجيل لل1".
3. هنا وضغط الدم، ويمكنك حفظ الأحداث التي تم تسجيلها في هذه الفئة.
4. فئات إضافية، يرجى الضغط على زر + في الرمادي الحقل الحدث!
A) زر اضافة: بعد دخول فئة جديدة، يمكنك حفظ مع هذا الزر.
B) الزر الخلف: سأعود إلى الشاشة 1 من الملف الشخصي.
C) حذف زر: I حذف هذه الفئة.
5. دعونا نضع هذا الحدث!
6. يرجى الاستفادة من واحدة من العمود أحداث الرموز. تظهر شاشة التسجيل.
7. كل حدث رمز الحنفية، دعونا نضع النقاط على!
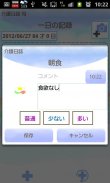
* كيف أحداث تسجيل *
1. الجزء السفلي من الشاشة "تسجيل من 1"، يرجى الضغط على زر +.
2. وسوف ينتقل إلى "الحدث".
تم تسجيل أستطيع تحريك خطة قبل يوم أو تاريخ سابق: A) قبل زر الموعد المحدد.
B) زر تأجيل: أستطيع تحريك سجلت الخطة مع تاريخ اليوم التالي أو بعد ذلك.
وج) الاختيار: عند تشغيل علامة الاختيار عندما تم تسجيل هذه الخطة قد اكتملت، هو الاختيار في القائمة تحت التقويم، يمكنك ان ترى في لمحة ان ما قمتم به!
E) سلة المهملات: يمكنني حذف التعيينات.
يرجى محاولة للضغط على زر القائمة في "الأحداث" الشاشة. وهذا عرض "الإخطار" وزر "البريد". "إعلام" لضبط المنبه لهذه الخطة، في وظيفة ليتم إخطار، "البريد"، يمكنك إرسال الخطة عن طريق البريد الإلكتروني.
3. الوقت، والعنوان، أدخل التعليق، ثم حدد الرمز. I السيارات حفظ والعودة في زر "رجوع" على هاتفك النقال.
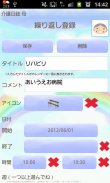
* كيف لتكرار تسجيل الجدول الزمني *
1. في الجزء السفلي من الشاشة "تسجيل من 1"، يرجى الضغط على زر "كرر" السهم إلى اليمين من زر +.
2. وسوف ينتقل إلى "قائمة كرر" الشاشة.
3. يرجى الضغط على زر "جديد".
4. وسوف ينتقل إلى "تكرار تسجيل" الشاشة.
5. I جعل تسجيل تكرار المواعيد. يرجى النظر هناك لكيف يوصف تسجيل على الشاشة. يمكنك حفظ التسجيل المتكرر لأنماط مختلفة!
6. كل من المدخلات I سيوفر في زر "حفظ" عند الانتهاء.
* وصف الأزرار أسفل التقويم (من اليسار) *
1. زر EDIT: الذهاب إلى الشاشة، "1st من الملف"، يمكنك التسجيل بسجل يومي.
2. زر اليوم: أستطيع أن أعود إلى تاريخ اليوم.
3. اليسار والزر الأيمن: أستطيع تحريك التاريخ إلى اليسار واليمين.
4. زر الرسم البياني: مثل ضغط الدم، يمكن عرض كل حدث الرسم البياني.
5. صورة قائمة زر: يمكنك عرض قائمة من الصور التي قمت بحفظها.
6. زر الكاميرا: اطلاق النار الصورة، أو أنا يمكن أن ينقذ صورة من معرض المحمول.
* شاشة صور من الوصف *
1. I اضغط على زر صور القائمة في أسفل التقويم.
2. وسوف ينتقل إلى "صور" الشاشة.
3. يرجى محاولة للاستفادة من الصورة. وسوف ينتقل إلى "تحرير الصور".
4. يمكنك حفظ وترك تعليق على كل من الصور!
5. السيارات حفظ في زر "رجوع" من خدمات الهاتف النقال، وسوف أعود.
6. I اضغط على زر "ألبوم" في الجزء السفلي من الشاشة.
7. وسوف ينتقل إلى "الألبوم".
8. الرجاء محاولة الوجه من خلال بأصابعك الألبوم! وسيتم تشغيل واللسان لصورة عليها من قبل ~!
* كيفية تحرير بالنقر على الصور المخزنة تحت تقويم *
1. يرجى محاولة للاستفادة من صورة واحدة التي يتم عرضها في شاشة التقويم.
2. وسوف تنتقل إلى شاشة التحرير.
غادر العلوي: I يمكن إرسال الصور عن طريق زر البريد الإلكتروني.
العلوي الأيمن: هو زر تويتر. يمكنني تحميل الصور إلى تويتر.
أسفل اليسار: هذا هو الزر للانتقال إلى تحرير صور.
القاع الثاني اليسار: الدورية عكس اتجاه عقارب الساعة.
الأوسط: I يمكن لقطة الصور.
أقل الصحيح الثاني: دوران لعقارب الساعة.
انخفاض الحق: أنا يمكن أن تتحرك إلى الشاشة صور.
* وصف زر القائمة *
1. البحث: يمكنني العثور على تعليقات هذه الملاحظات.
2. الإعداد: أنا سوف تحديد الإعدادات الأساسية من التطبيق.
3. علامة: لا أستطيع إضافة علامة في تاريخ التقويم.
4. كلمة السر: I تعيين كلمة المرور.
5. تويتر مجموعة: مجموعة من تويتر.
6. الآخر → النسخ الاحتياطي: I سيوفر البيانات إلى بطاقة SD.
→ نسخ إلى بطاقة SD: فقط إذا كان هناك بطاقة SD الداخلية والخارجية، وأنا استخدم.
كلمات البحث: الرعاية التمريضية، والتقويم، والرعاية
※ اكتساب شبكة الاتصالات من الإعلانات، وتعودنا على الحصول على آخر عطلة.
※ الاعلانات مدفوعة الاجر لن يتم عرض الإصدار.
介護日誌 - معلومات APK
نُسخة APK: 1.1.9الحزمة: info.androidx.kaigodiaryfآخر إصدار من 介護日誌
نُسخ أخرى


 4.15
4.15


 4.33
4.33


تطبيقات من الفئة نفسها


